System Configuration
Storage
Device Maintenance
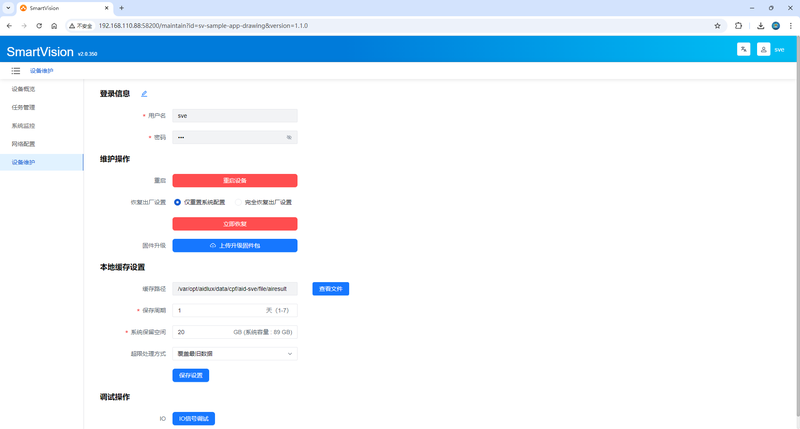
1. Login Information
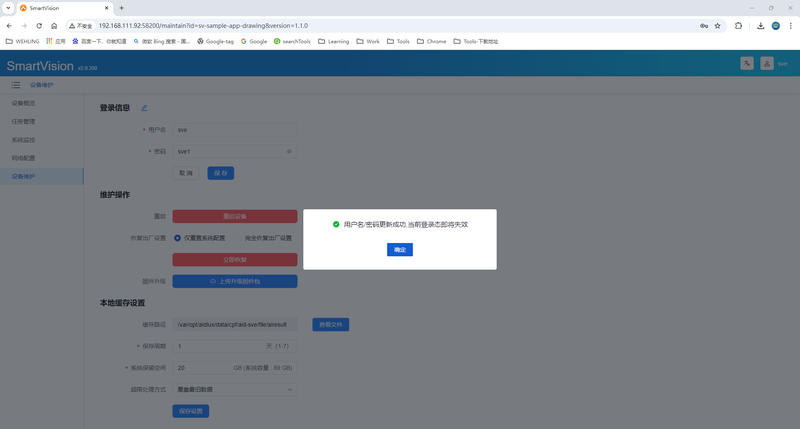
Click  to edit login information and modify the username and password. After modification, click 【Save】. When the update success popup appears, click 【Confirm】 to be redirected to the login page. Log into SVE again.
2. Local Cache Settings
- Cache Path: Displays the default save path, which cannot be edited. Click the 【View Files】 button to open a new browser page and view the corresponding AI inference result files on the environment.
- Retention Period: Set the retention time for inference result files. Minimum is 1 day, maximum is 7 days.
- System Reserved Space: The disk space reserved for the operating system itself. The system capacity varies depending on the hardware environment, and the reserved space value cannot exceed the system capacity.
- Overflow Handling: Includes "Overwrite Oldest Data" and "Stop Caching Newest Data" two options.
- Overwrite Oldest Data: When saving the latest result data, the oldest current data will be deleted simultaneously.
- Stop Caching Newest Data: The latest result data will no longer be saved, but can be externally integrated via FTP or HTTP (requires enabling the corresponding method).
3. Debug Operations
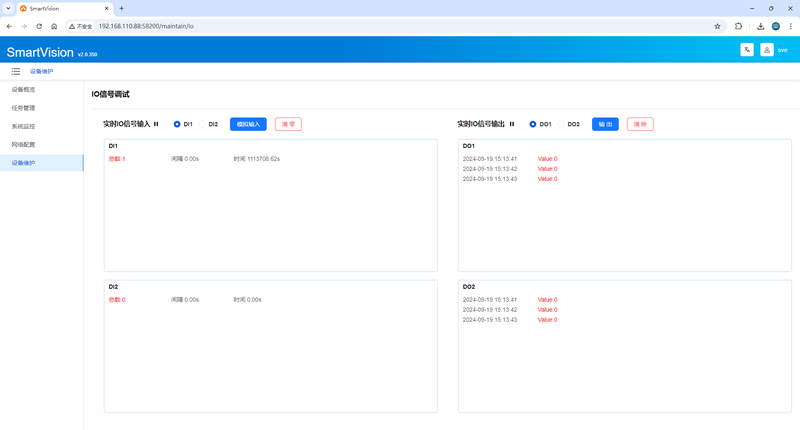
Click 【IO Signal Debug】 to navigate to the 【IO Signal Debug】 interface. Use 【IO Capture】 for pre-inference environment debugging before the camera performs inference.
Utilities
Task Management
Application List
After installing the SmartVision Engine application, two sample applications are built-in by default: 【Sample App (Capture)】 and 【Sample App (Segmentation)】. 【Sample App (Capture)】 does not include any inference and can be used for system and physical camera image capture debugging. The application list displays information about all currently available AI application packages in the system, including application name, version, status, and upload time. Taking 【Sample App (Capture)】 as an example, the following describes each function of the smart camera.
 Enter Runtime Preview: Navigate to the "Runtime Preview" interface to view the original and result images generated during AI inference in real time.
 Start ▪
  Stop Application: Control the start and stop of AI application packages.
 Enter Imaging Settings: Configure camera parameters, algorithm threshold parameters, and result data integration settings.
 View Application Runtime Logs: View the print information generated during application execution.
 Delete Application: Remove unwanted AI application packages.
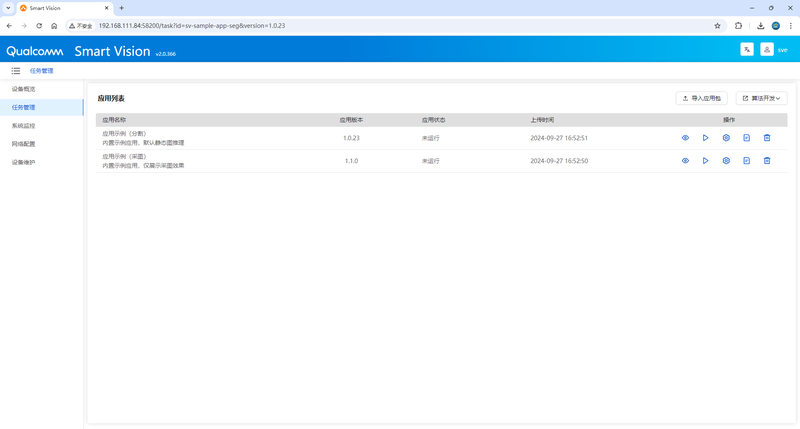
Click the 【Import Application Package】 button to upload the user's AI application package (for application package format, content, and how to build it, see the "Build Your First Camera Application" section).
Runtime Preview
View the original and result image data of AI inference in real time, along with the sampling count. The sampling count is reset to zero each time the application starts.
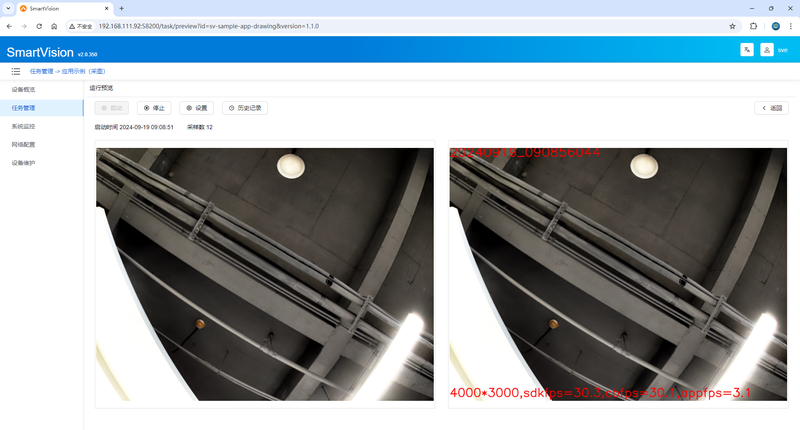
Click the 【Start】 and 【Stop】 buttons to control the start and stop of the AI application package. The corresponding buttons are dynamically enabled based on the current state of the application package. After the AI application is actually running, it performs object detection and inference to produce results. The left side shows the original image, and the right side shows the corresponding result image after inference.
Click the 【Settings】 button to navigate to the 【Imaging Settings】 interface and modify the relevant parameters. Note: This button cannot be clicked while the algorithm application is running.
Click the 【History】 button to open a panel on the right side, displaying the history of original and result images after inference. Click any image to view it independently, with support for 【Fullscreen】, 【Zoom In】, 【Zoom Out】, and 【Rotate】 operations. 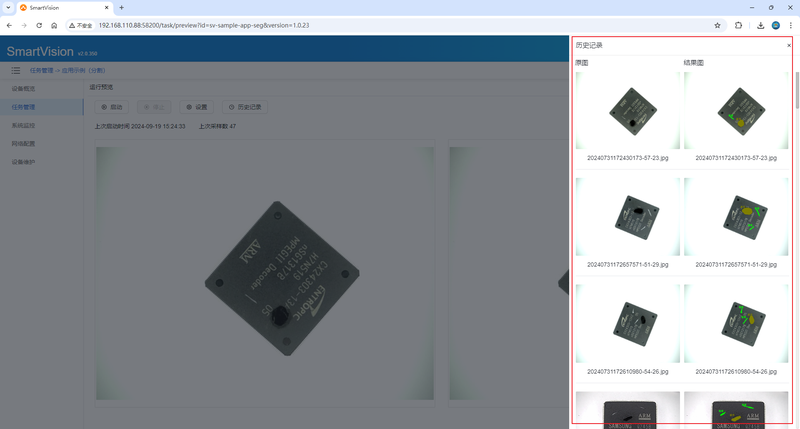
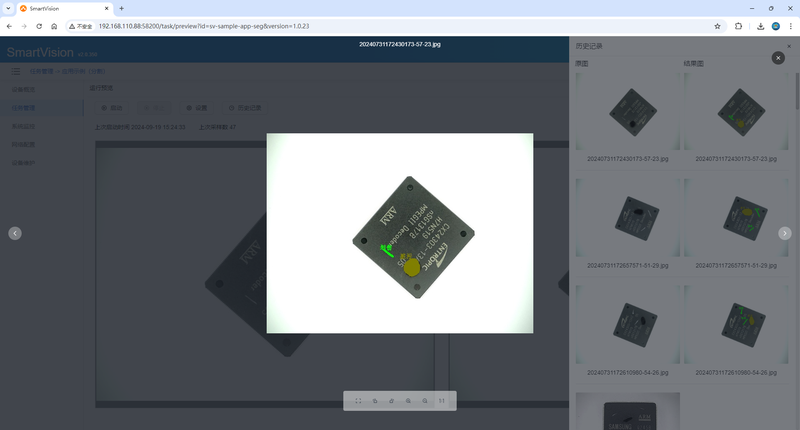
Click the 【Back】 button to return to the 【Application List】 interface.
Imaging Settings
Adjust camera parameters to achieve optimal imaging results. As shown below:
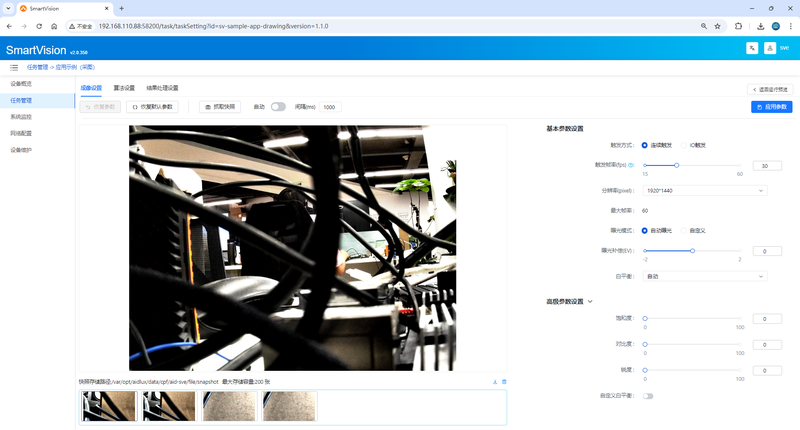
【Trigger Mode】 is divided into "Continuous Trigger" and "IO Trigger" two modes.
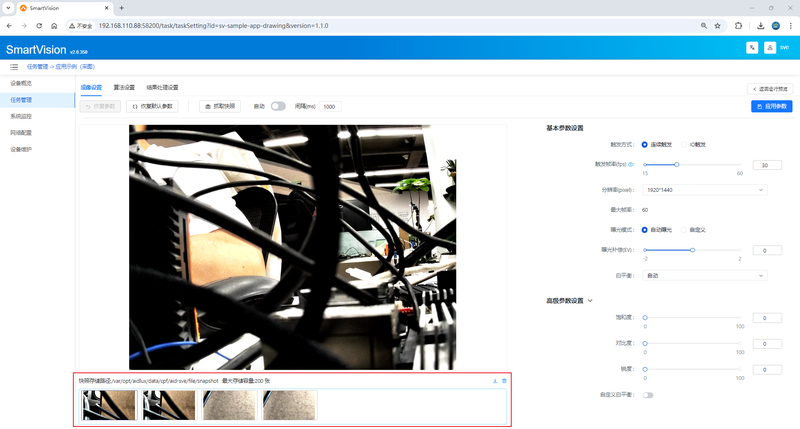
When 【Continuous Trigger】 is selected, the configuration is auto-saved. After successful operation, the camera opens automatically, and the camera's captured image is displayed in real time. This mode supports updating camera parameters while the camera is open.
Click the 【Capture Snapshot】 button to take a photo of the current real-time image and display it below. Enable the 【Auto】 button to automatically capture and display snapshots at the set interval.
When 【IO Trigger】 is selected, the configuration is auto-saved. After successful operation, the camera opens automatically. In this mode, an external trigger signal is required. Once the external signal is received, the camera image is captured, and the corresponding image and sampling count are displayed below.
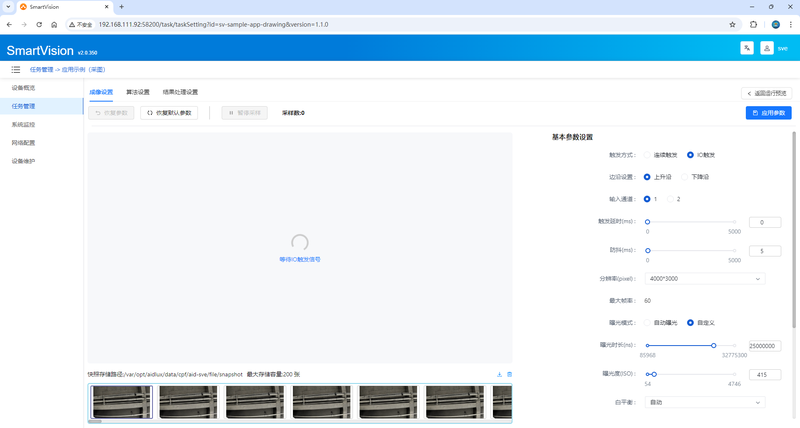
In the image capture interface, camera parameters can be configured, including trigger settings and imaging parameter adjustments.
Basic Parameter Settings
- Trigger Mode: When "IO Trigger" is selected, the "Edge Setting" and "Trigger Delay (µs)" must be configured. "Edge Setting" includes "Rising Edge" and "Falling Edge" options. The "Input Channel" must be configured, with channels 1 and 2 available. Set the "Trigger Delay" and "Debounce" duration. The "Trigger Delay" parameter defaults to 0 ms, and "Debounce" defaults to 5 ms.
- Exposure Settings: When "Auto Exposure" is enabled, only "Exposure Compensation" can be edited. When "Custom" is enabled, "Exposure Duration" and "Exposure (ISO)" parameters can be edited.
- White Balance Settings: When "Custom White Balance" is enabled, the setting cannot be edited. Includes 7 white balance modes: "Incandescent", "Fluorescent", "Warm Fluorescent", "Daylight", "Cloudy", "Dusk", and "Shade".
Advanced Parameter Settings
- Saturation: Adjusts the purity or vividness of colors in the image.
- Contrast: Adjusts the difference between the brightest and darkest parts of the image.
- Sharpness: Adjusts the clarity of edges in the image.
- Custom White Balance: When "Custom White Balance" is enabled, the "Color Setting Mode" can be edited. "Color Setting Mode" includes "Color Temperature" and "RGB Gain" modes. When "RGB Gain" is selected, "R Gain", "G Gain", and "B Gain" can be edited.
Click the 【Apply Parameters】 button to modify camera parameters. If the adjusted image is not as good as the previous effect, click the 【Restore Parameters】 button to restore. Snapshot images support 【One-Click Export Zip】, 【One-Click Delete】, and 【Single File Delete】. Currently, a maximum of 200 snapshot images is supported. When exceeded, the earliest image will be deleted when a new snapshot is generated.
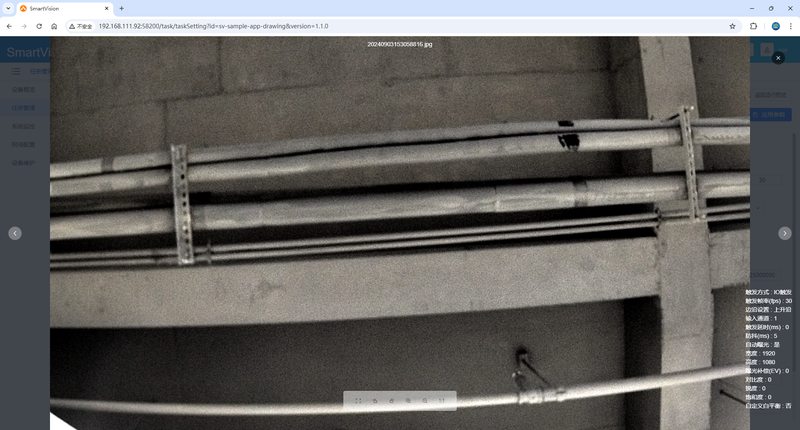
Click a snapshot image to view the camera parameters at the time of the snapshot independently, with support for 【Fullscreen】, 【Zoom In】, 【Zoom Out】, and 【Rotate】 operations.
Click the 【Back to Runtime Preview】 button to navigate to the 【Runtime Preview】 interface.
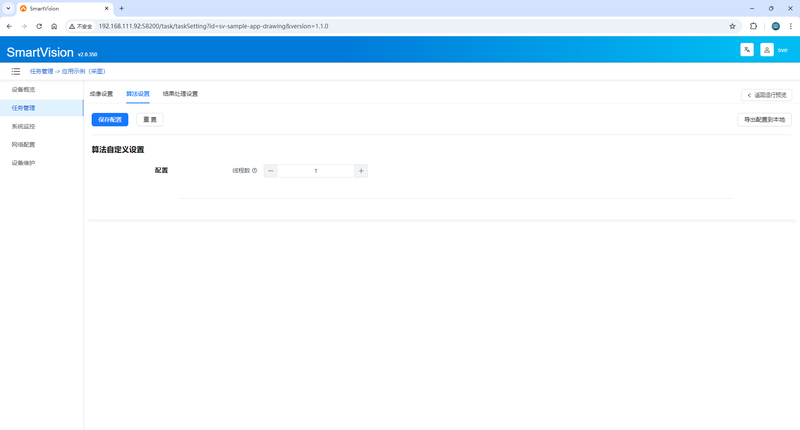
Algorithm Settings
- This interface displays the threshold-related parameters of the corresponding AI application. Different applications have varying threshold parameters, with support for dynamic presentation.
- Click 【Save Configuration】 to store the modified parameters.
- Click 【Reset】 to restore the parameters to the last saved state.
- Click 【Export Configuration to Local】 to export the currently displayed parameters as a JSON file to the local machine.
- Click 【Back to Runtime Preview】 to switch to the 【Runtime Preview】 interface.
Result Processing Settings
After AI application inference, the results can be configured for integration with external systems. As shown below:
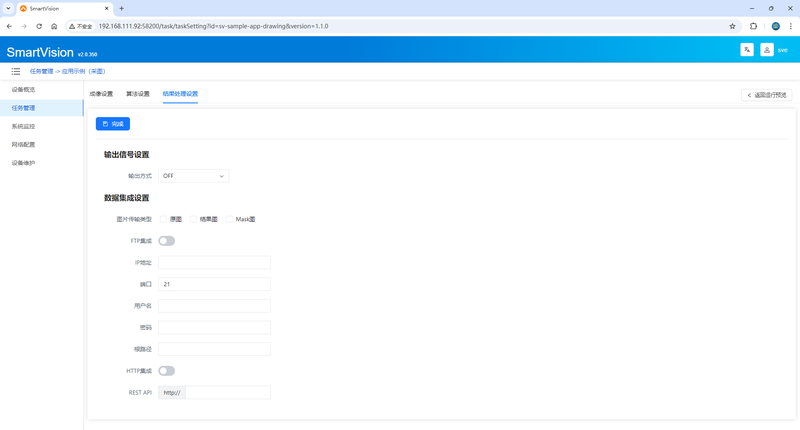
1. Output Signal Settings for integration with external control systems. Supports three modes: OFF, IO Signal, and TCP.
- OFF: Indicates no external signal is generated.
- IO Signal: Configure the signal types for Pins 1 and 2, and the NG signal duration. Based on the pin signal definitions in Table 2-2.【DO#1】corresponds to【20-9】,【DO#2】corresponds to【20-10】.
- TCP Signal: Configure the IP address and port.
2. Data Integration Settings for integration with external business systems.
- Image Transfer Type: AI inference results include "Original Image", "Result Image", and "Mask Image". Users can select which images to transfer based on actual needs.
- FTP Integration: Only when the FTP integration function is enabled, the IP address, port, username, password, and root path below can be edited and configured.
- HTTP Integration: Only when the HTTP integration function is enabled, the REST API can be edited and configured. The system will transmit via HTTP, with content-type as multipart/form-data and parameter name as files.
Click 【Back to Runtime Preview】 to switch to the 【Runtime Preview】 interface.
Click 【Done】 to save the settings and automatically navigate to the 【Runtime Preview】 interface.