Network Configuration
Configuring a Dynamic IP Address for the Ethernet Port
When there is a LAN in the developer's development environment and a DHCP server in the LAN assigns DHCP IP addresses to the connected devices, you can obtain a dynamic IP address as follows.
The Rhino Pi-A1 device is set to DHCP IP by default, so after powering on and connecting an Ethernet cable, the IP address will be obtained automatically. On the Windows computer, press win+R, enter cmd in the popup window to open a terminal window, and enter the following command in the window:
- Enter
adb shellto access the host system.
adb shell // Enter the system- Run the command
ifconfig eth0to check the returned IP address.
ifconfig eth0 // Check the IP address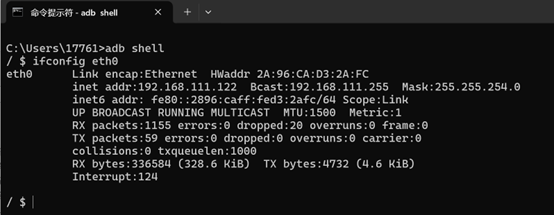
Configuring a Static IP Address for the Ethernet Port
The Rhino Pi-A1 supports configuring a static IP address. Developers can follow the steps below to configure it:
- If the Ethernet cable is connected to the WAN port, configure the static IP of eth0 accordingly. On the Windows computer, press win + R, enter
cmdin the popup window to open a terminal window, and run the following commands:
adb shell- Obtain the connection name: connection_name
nmcli -g GENERAL.CONNECTION device show eth0- Configure the static IP settings
nmcli connection modify 'connection_name obtained in the previous step' ipv4.method manual ipv4.addresses 192.168.1.231/24 ipv4.gateway 192.168.1.1 ipv4.dns '114.114.114.114'- Apply the network configuration
nmcli device reapply eth0Note
The IP address and subnet mask set here are for reference only. Configure them according to the actual situation.
Restoring the Dynamic IP Settings
When users need to restore from a configured static IP to dynamic IP mode, they can follow the steps below:
- On the Windows computer, press win+R, enter
cmdin the popup window to open a terminal window, and enter the following commands in the window:
adb shell // Log in to the system- Obtain the connection name: connection_name
nmcli -g GENERAL.CONNECTION device show eth0- Restore the dynamic IP configuration
nmcli connection modify 'connection_name obtained in the first step' ipv4.method auto ipv4.addresses '' ipv4.gateway '' ipv4.dns ''- Apply the network configuration
nmcli device reapply eth0Configuring Wireless WIFI
Note
When connecting to WIFI, connect an antenna to the device.
The Rhino Pi-A1 supports connecting to the network via WIFI. When developers want to connect the board to a LAN WIFI, they can connect as follows:
- On the Windows computer, press win+R, enter
cmdin the popup window to open a terminal window, and enter the following command to access the system:
adb shell- Run the command to scan for WIFI
nmcli dev wifi list 2>&1 | lessNote
Press the Enter key to view all scanned APs line by line. To exit the scan interface, press q.
- Connect to WIFI
nmcli dev wifi connect "WiFi-SSID" password "WiFi-password"- Disconnect from WIFI
nmcli connection down id <WIFI-SSID>- Delete the WIFI connection
nmcli connection delete <WIFI-SSID>