Sample Projects
AI Vision
Prerequisites: see Getting Started and System Configuration.
Run and Preview Built-in Segmentation App
Taking 【Sample App (Segmentation)】 as an example, run and preview inference results
Preview Runtime Effects
- 点击列表中的【启动/停止应用】按钮,run the sample application。
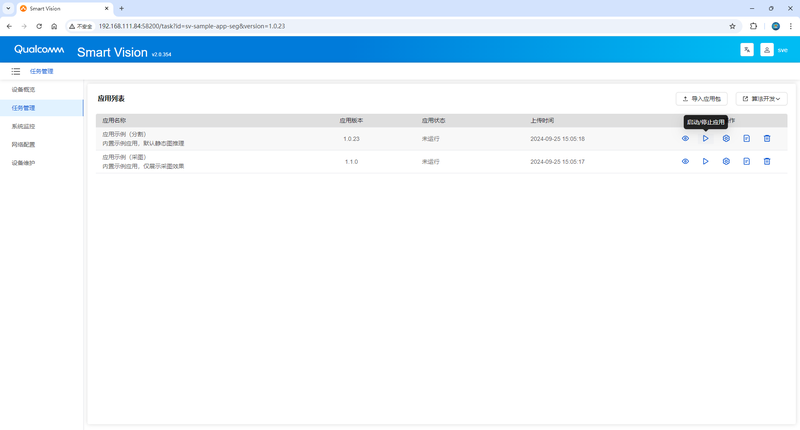
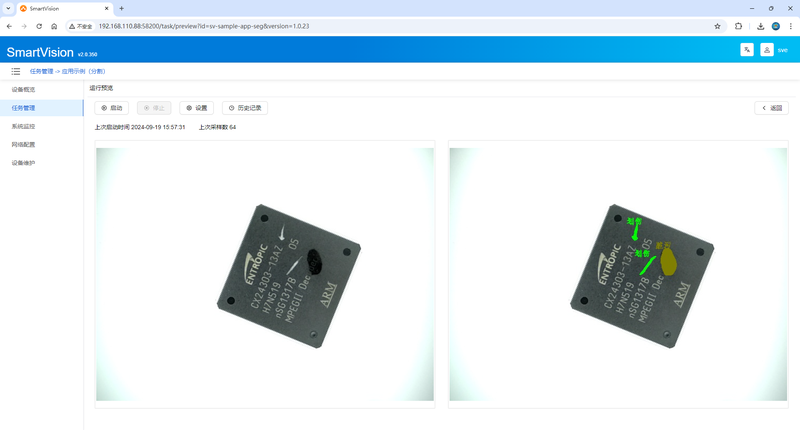
- click 【Runtime Preview】 to view the runtime effects。
Algorithm Settings
- This interface displays the threshold-related parameters of the corresponding AI application. Different applications have different threshold parameters, with support for dynamic presentation。
- 点击【Save Config】按钮对修改后的参数进行存储。
- 点击【Reset】按钮,可恢复至上一次保存后的参数。
- 点击【Export Config to Local】按钮,可将当前页面显示的相关参数以json文件格式导出至本地。
- 点击【Back to Runtime Preview】按钮,切换至【运行预览】界面。
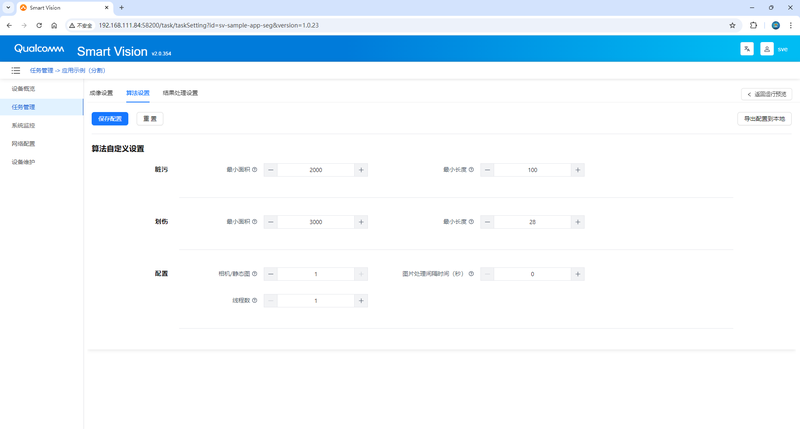
- Contamination: Contamination缺陷。
- Min Area:Contamination检测的Min Area
- Min Length:Contamination检测的Min Length
- Scratch: Scratch缺陷。
- Min Area:Scratch检测的Min Area
- Min Length:Scratch检测的Min Length
- Configuration:
- Camera/Static Image: Enable camera; 0-disable, 1-enable
- Image Processing Interval (seconds): Image processing interval; unit (seconds)
- Thread Count: 应用实际处理图片的所用的Thread Count,默认1
Generate and Deploy App from AI Creator with One Click
AI Application Generation
- 打开浏览器,登录到AI Creator。点击【项目中心】进入项目列表。找到已经训练完成的【芯片分割】项目(AICreator模型如何训练请参考AICreator用户Usage Instructions文档),点击【进入项目】可查看模型详情。如下图所示:
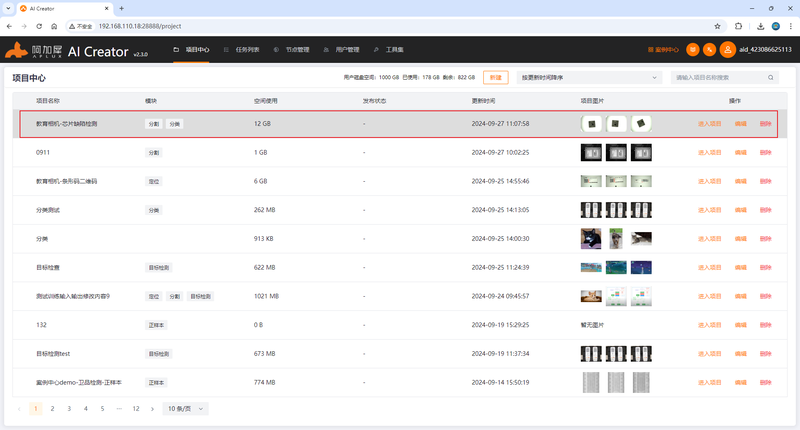
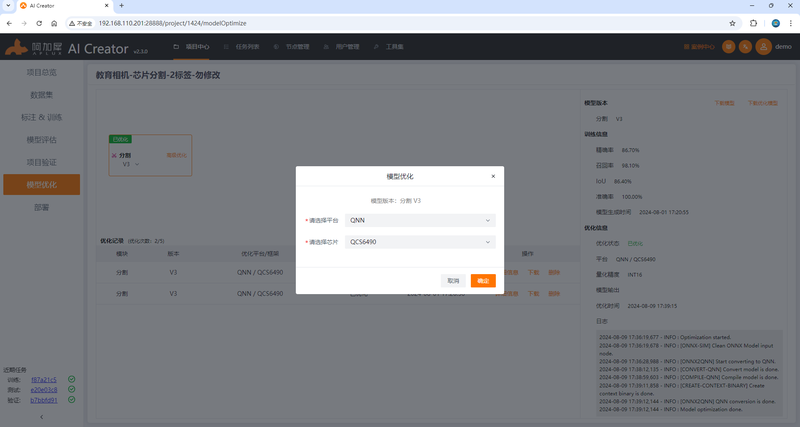
注: 由于模型是在 x86 平台下训练的,如果希望在智能相机或边缘端运行,还需要对模型进行优化。AICreator 内置了 AIMO 模型优化功能,支持一键优化和高级优化。针对运行模型的设备芯片型号,一键优化预设了一系列参数,用户只需选择运行模型的设备芯片型号即可。我们实验使用的智能相机芯片型号为 QCS6490,并推荐将模型转换为 QNN 格式以进行运行。
- 点击左侧【 模型优化 】标签,在优化发布界面,点击【一键优化】,选择 QNN 格式和 QCS6490 芯片型号,即可完成模型优化。
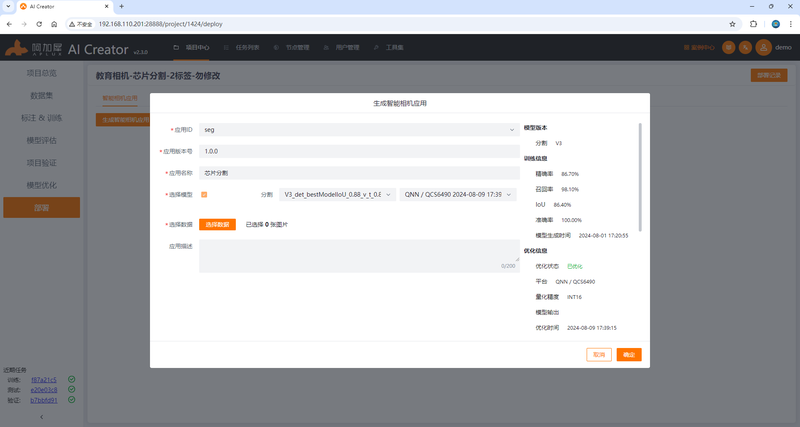
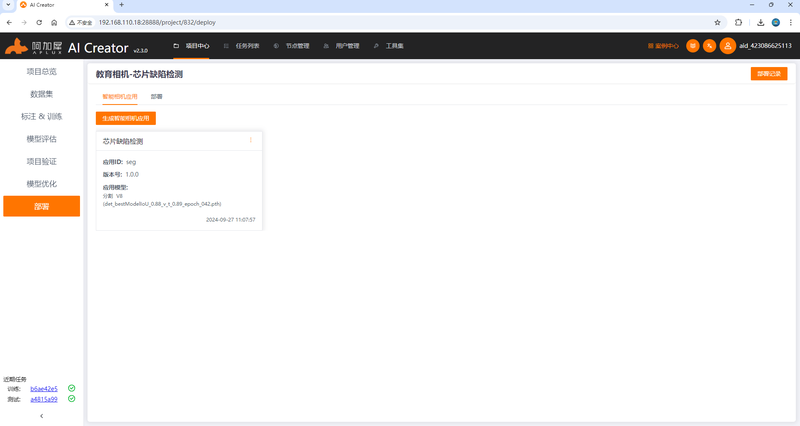
- 点击左侧【部署】标签,点击【生成智能相机应用】,填写应用ID、应用版本、应用名称等应用信息,并选择图片数据后点击确定,即可生成AI应用。
Deploy AI Application to Camera
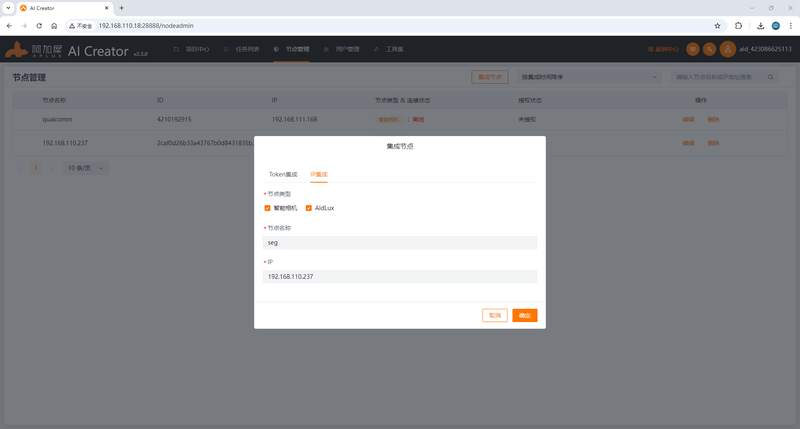
- 在节点管理页面,点击【集成节点】按钮,在弹出的表单中输入节点名称和智能相机的IP地址(关于如何查看智能相机IP,请参考《第二步:Configuration设备信息》)。输入完成后,点击确定。
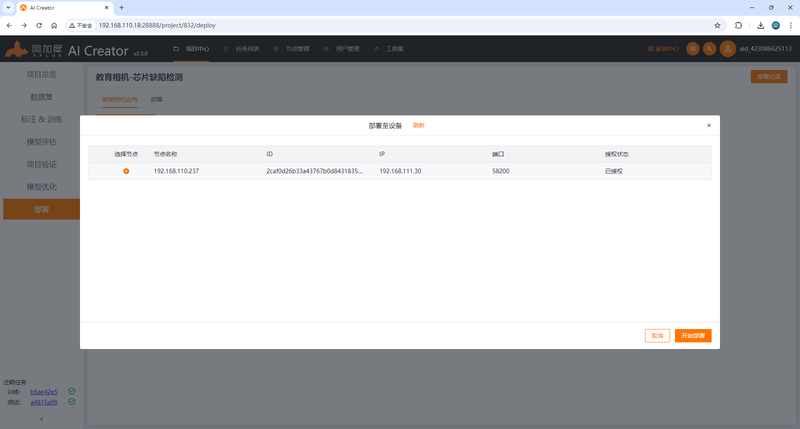
- 智能相机集成成功后,返回项目的应用生成界面,选择上一小节中生成的智能相机应用并点击【部署】,然后选择已集成的智能相机节点,点击【开始部署】
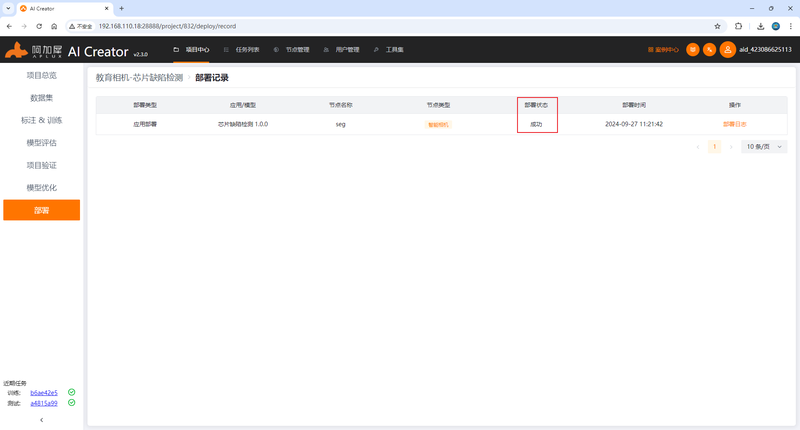
- 点击后将会跳转到【部署记录界面】,当【部署状态】为成功后,表示该应用已部署完成。
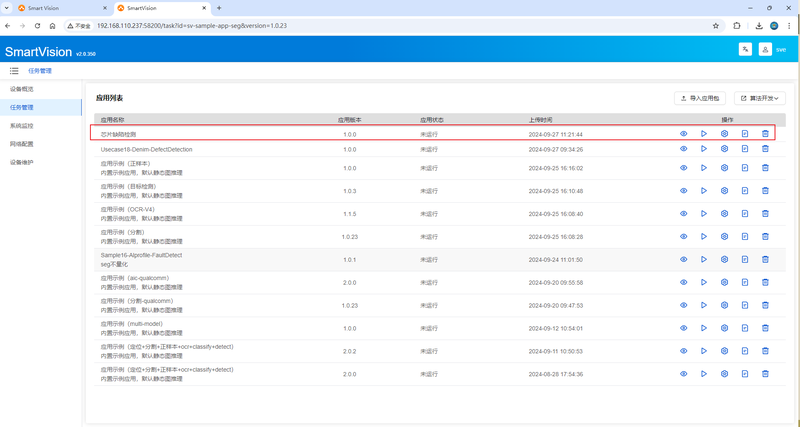
- 返回智能相机界面查看应用列表,已新增一条数据,即表示部署成功。运行即可查看推理效果。
Preview Runtime Effects
- 点击列表中的【启动/停止应用】按钮,run the sample application。
- click 【Runtime Preview】 to view the runtime effects。
Build Your First Camera Application
一、Generate Sample Application (with Source Code)
To help developers get started quickly, the AidLux system provides the appc command-line tool by default, which can directly generate sample applications based on the SmartVision SDK
Sample code is available in both C++ and Python
appcUsage Instructions
Enter the AidLux command-line terminal,输入"appc -h"to get usage help。

(1)Create Project
You can create different project types using: appc init with specified parameters。
For more details, use: appc init --help。

(2)Package Project
After development is complete, you can package the project using: appc package。
Command format:appc package -p <项目路径>
Execute the following commands on the Camera:
# Generate C++ sample code in the local directory
  aidlux@aidlux:~$ appc init -t "cpp" -n demoApp
aidlux@aidlux:~$ cd demoApp# Generate Python sample code in the local directory
aidlux@aidlux:~$ appc init -t "py" -n demoApp
aidlux@aidlux:~$ cd demoApp二、Application Source Code Description
The file structure is as follows:
├── README.md
├── config                   #Configuration文件
│   ├── camera.config        #相机参数Configuration文件(需要补上相机参数Configuration的说明)
│   ├── algorithm.config     #算法参数Configuration文件(需要补上算法参数Configuration的说明)
│   ├── model.config         #模型相关Configuration文件
├── imgs                     #Static image directory
├── lib                      #Third-party library directory
├── manager.sh               #Application startup script
├── model                    #Model file directory
│   ├── Segment_V41_0
│   │   └── det_bestModelIoU_xxx_int8.serialized.bin  #Model file
│   ├── det.txt
│   └── modelInfo.json       #模型Configuration文件
├── release.txt              #Application description file
├── src                      #Application main program directory
│   ├── CMakeLists.txt       #CMake build file
│   ├── main.cpp             #Application main code
│   ├── main.hpp             #Application main code头文件
│   └── model.cpp            #Model loading main code
├── svapp #Executable program file├── config #Configuration文件
│ ├── camera.config #相机参数Configuration文件(需要补上相机参数Configuration的说明)
│ ├── algorithm.config #算法参数Configuration文件(需要补上算法参数Configuration的说明)
│ ├── model.config #模型相关Configuration文件
├── lib #Third-party library directory
├── manager.sh #Application startup script
├── model #Model file directory
│ ├── Segment_V41_0
│ │ └── det_bestModelIoU_xxx_int8.serialized.bin #Model file
│ ├── det.txt
│ └── modelInfo.json #模型Configuration文件
├── release.txt #Application description file
├── svapp.py #Application main code三、Source Code Compilation and Packaging for Camera Deployment
C++ Example
1. Verify the camera CMake compilation environment
执行cmake判断是否安装cmake命令。
# 未安装cmake
aidlux@aidlux:~$ cmake
bash: cmake: command not found
如果没有安装,执行以下命令安装cmake。
aidlux@aidlux:~$ sudo apt-get update
aidlux@aidlux:~$ sudo apt-get install cmake
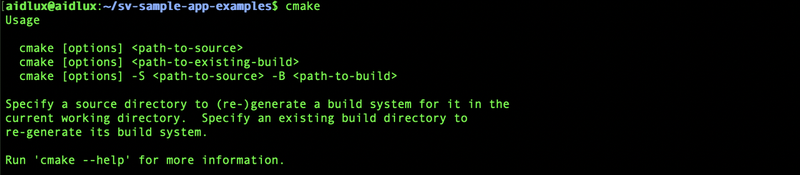
安装完成后,执行cmake命令出现帮助信息即为安装成功,如图所示:
2. 编译源代码
Camera上执行:
# 进入示例应用目录
aidlux@aidlux:~$ cd ~/demoApp

# 执行编译命令
aidlux@aidlux:~/demoApp$ cd src/
aidlux@aidlux:~/demoApp/src$ mkdir build
aidlux@aidlux:~/demoApp/src$ cd build/
aidlux@aidlux:~/demoApp/src/build$ cmake ..
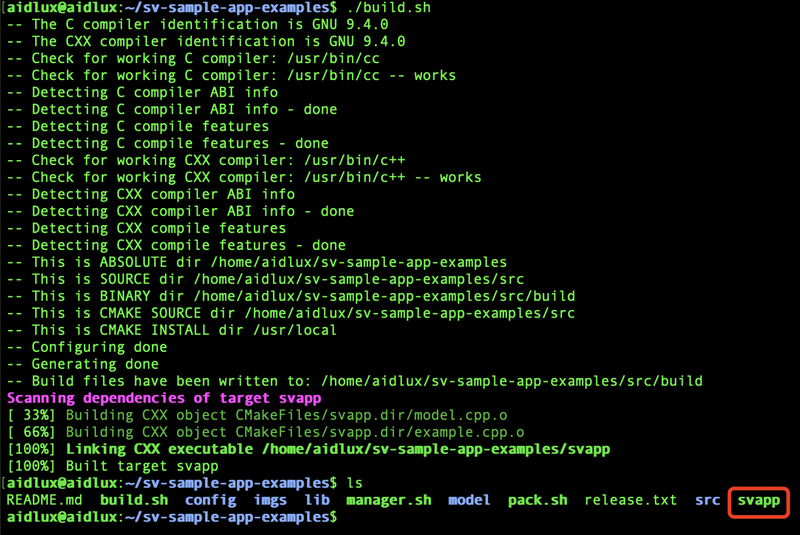
aidlux@aidlux:~/demoApp/src/build$ make
编译完成后,会在应用根目录下生成可执行文件 svapp
3. 应用打包并部署
Camera上执行:
# 执行应用打包命令
aidlux@aidlux:~$ appc package -p ~/demoApp
打包完成后,会在应用目录下生成可直接部署的应用包:

至此,整个应用打包完成,接下来进行应用部署流程,可以将应用部署在本相机直接预览效果,也可以将应用部署到其他的相机设备上
场景 1:若需要将应用部署到本相机设备上:
Camera上执行: (1) 执行sve应用安装命令
# 执行sve应用安装命令
aidlux@aidlux:~$ appc install ~/demoApp.zip
💡注意:
若安装过程提示应用已存在,可以通过加入“-f”参数进行强制覆盖安装:
appc install -f ~/demoApp.zip
(2) 重启智能相机应用运行框架
💡注意:
需要重启相机应用运行框架服务后,智能相机应用列表才能重新加载,并展示解压后的应用
# 进入智能相机应用框架目录
cd /opt/aidlux/cpf/aid-sve/

# 重启相机应用运行框架
sudo ./manager.sh restart
(3) 打开相机管理网页,进入【任务管理】,查看部署的应用:
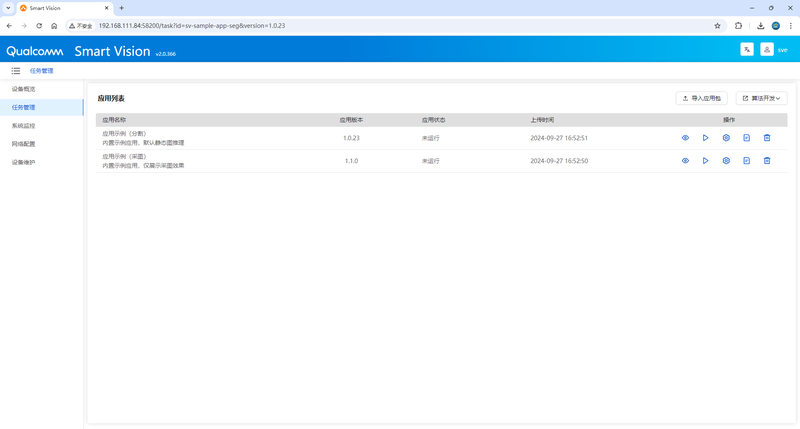
若应用列表中显示出示例应用,则表示已经部署成功
场景 2:若需要将应用部署到其他相机上,需要先将应用包拷贝到 PC 上
PC上执行: (1) 将应用包拷贝到 PC 本地
# 将相机上打包后的应用包拷贝到 PC 本地
scp aidlux@[camera IP]:/home/aidlux/demoApp.zip ./
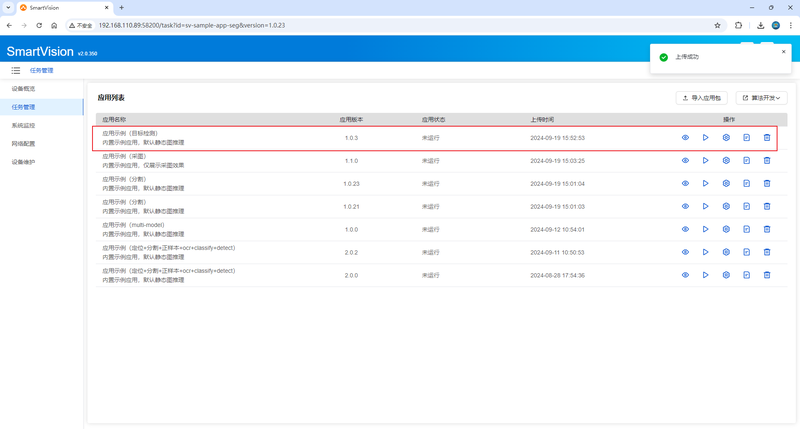
(2) 打开其他相机管理网页,进入【任务管理】,点击【导入应用包】,选择 PC 上的应用包
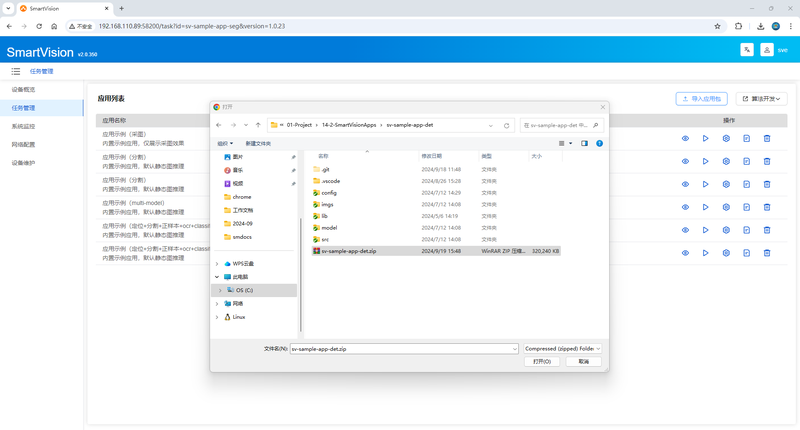
导入后,若应用列表中显示出示例应用,则表示已经部署成功
四、Preview Runtime Effects
- 点击列表中的【启动/停止应用】按钮,run the sample application。
- click 【Runtime Preview】 to view the runtime effects。
多媒体
待补充。
机器人或场景示例
待补充。