Example Projects
AI Vision
Generate App from AIC and Deploy to Camera
AI Application Generation
- Open your browser and log in to AI Creator. Click Project Center to enter the project list. Find the completed Chip Segmentation project (For AICreator model training, refer to the AICreator User Guide), click Enter Project to view model details. As shown below:
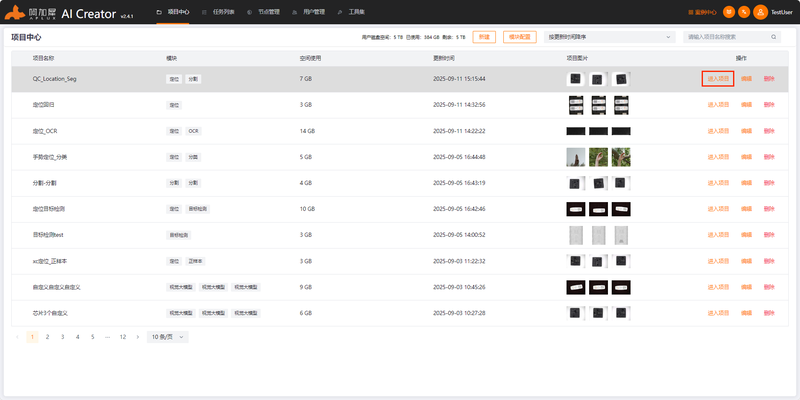
Note: Since the model is trained on the x86 platform, it needs optimization if you want to run it on a smart camera or edge device. AICreator includes the AIMO model optimization feature, supporting one-click optimization and advanced optimization. For the target device's chip model, one-click optimization presets a series of parameters — users only need to select the target device chip model. The smart camera we used for experiments has the QCS8550 chip, and we recommend converting the model to QNN format for deployment.
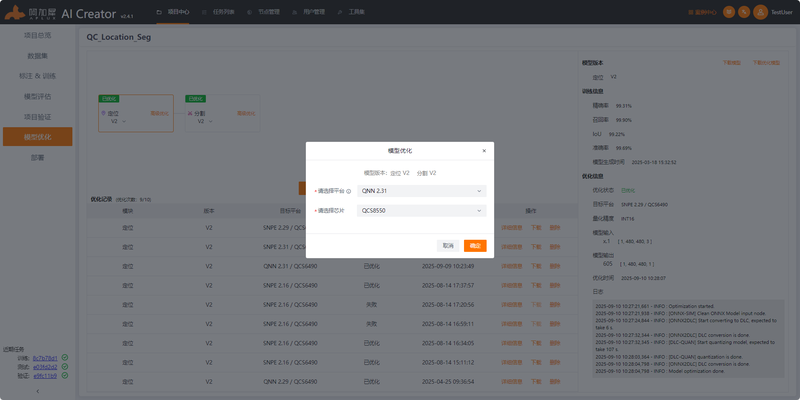
- Click the Model Optimization tab on the left. In the optimization and publishing interface, click One-Click Optimization, select QNN format and QCS8550 chip model to complete model optimization.
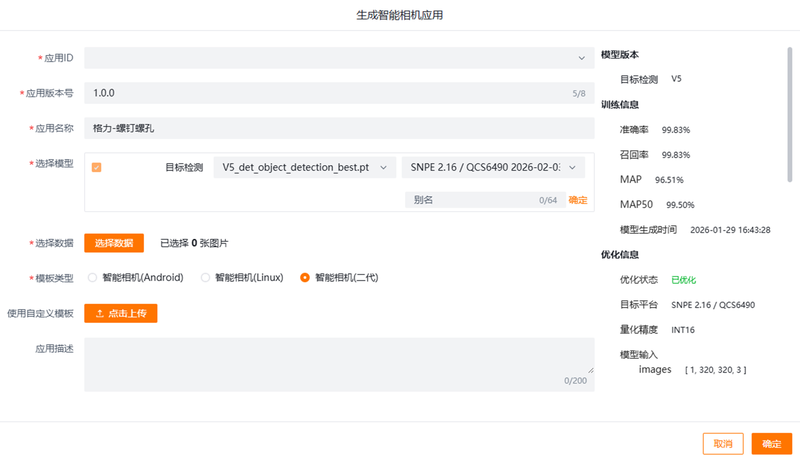
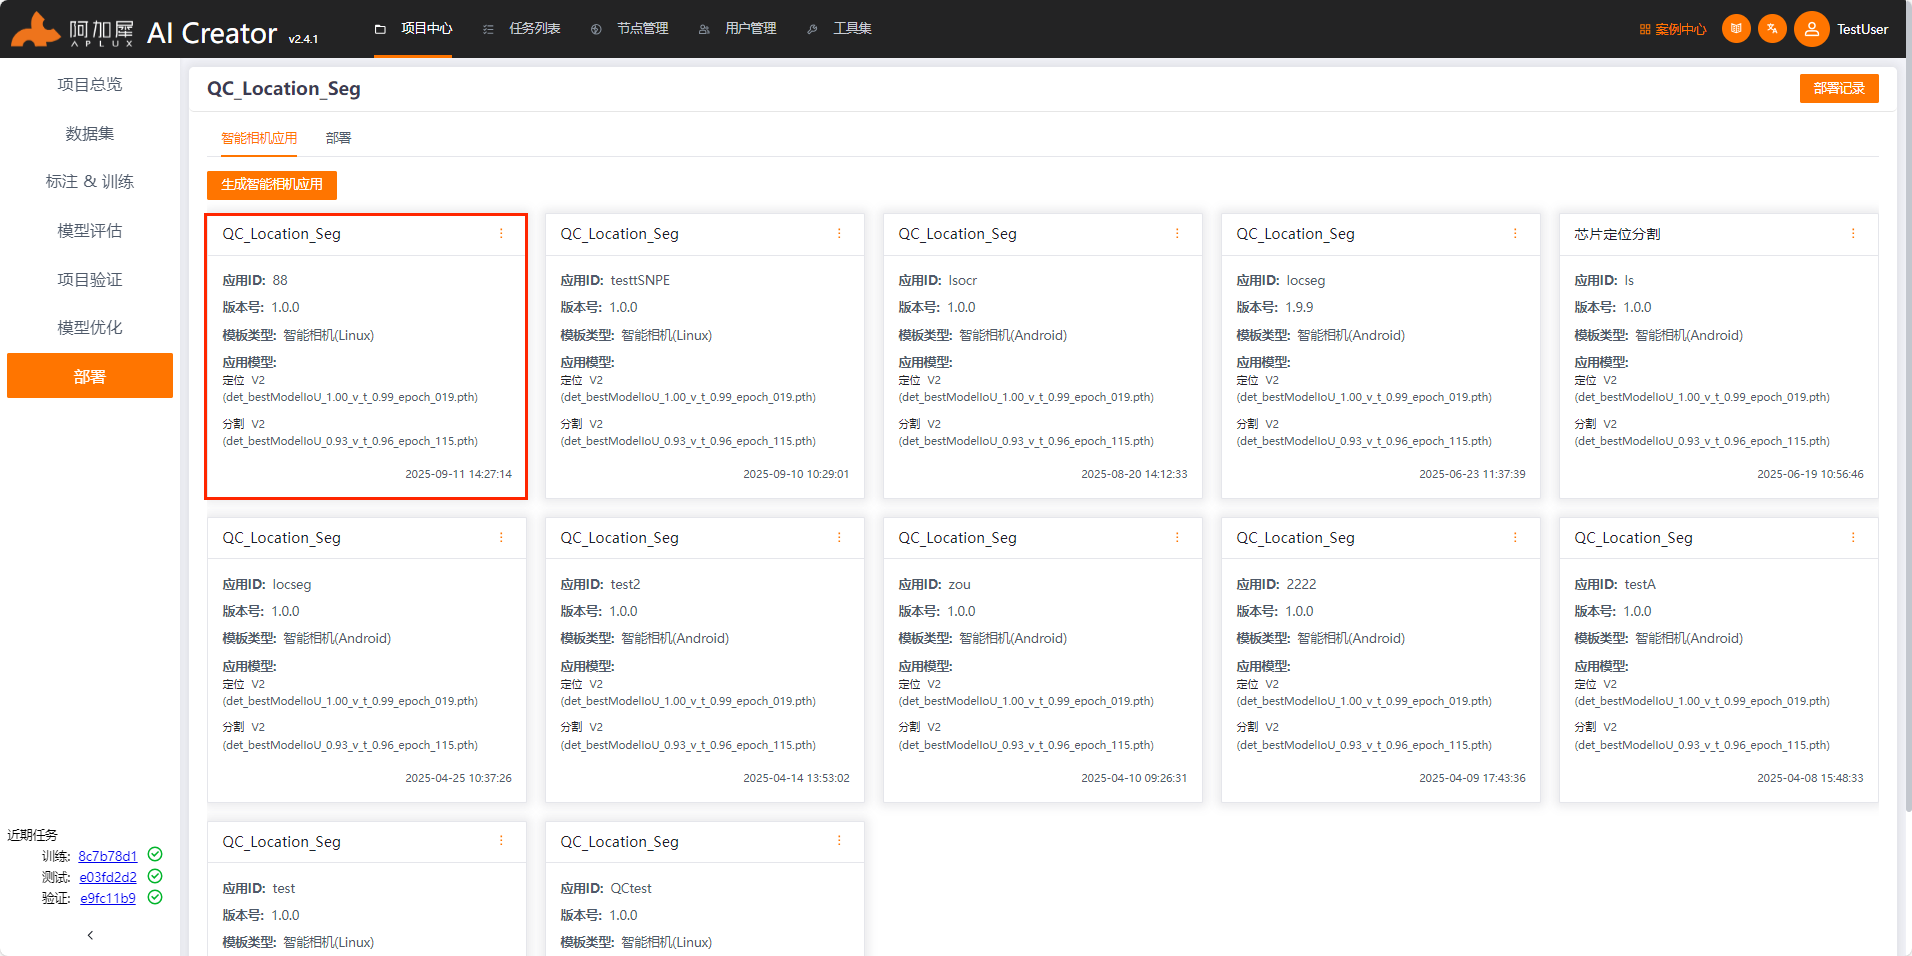
- Click the Deploy tab on the left, click Generate Smart Camera App, fill in the app ID, app version, app name, and other app information, select image data, then click OK to generate the AI application.
💡Note
The 2nd Generation Smart Camera runs on Linux by default, so select Smart Camera (Linux).
Deploy AI Application to Camera
- On the Node Management page, click Integrated Node → IP Integration. In the popup form, check all "Node Type" options, and enter the node name and the smart camera's IP address. After filling in, click OK.
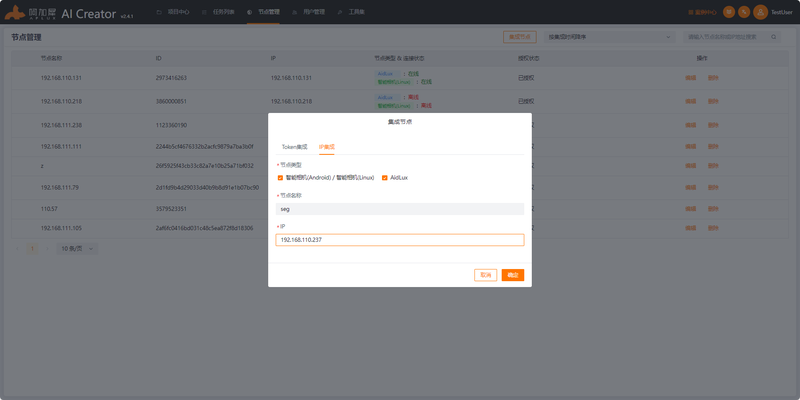
- After the smart camera is successfully integrated, return to the project's application generation page, select the smart camera app generated in the previous step and click Deploy, then select the integrated smart camera node and click Start Deployment.
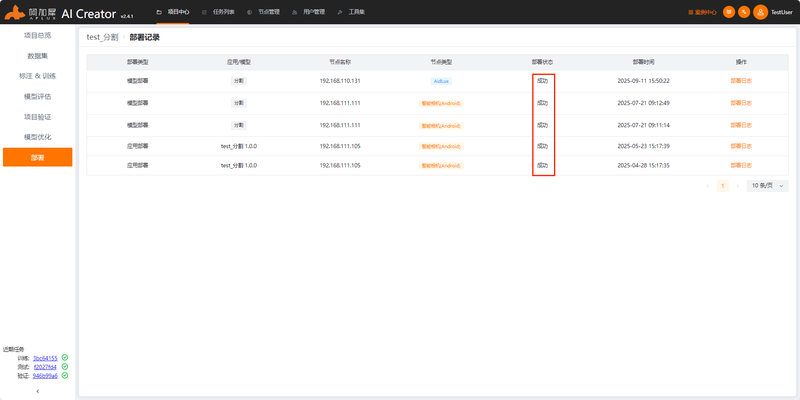
- You will be redirected to the Deployment Records page. Once the Deployment Status shows Success, the application has been deployed.
- Return to the smart camera interface and check the application list. A new entry indicates successful deployment. Run it to see the inference results.
- Click the Start/Stop App button in the list to run the example application.
Build Camera Application Locally
In addition to deploying apps through AIC, you can also build camera applications yourself. The build method is as follows.
Generate Example Application (with Example Source Code)
To help developers get started quickly, the AidLux system provides an appc command-line tool that can directly generate example applications based on the SmartVision SDK.
Example code is available in both C++ and Python versions.
appc Usage Guide
Enter the AidLux command-line terminal and type `appc -h` for usage help.

(1) Create Project
Create different project types using the command: appc init with specified parameters.
For more information, use appc init --help.

(2) Package Project
After development is complete, package a project using the command: appc package.
Command format: appc package -p <project path>
Execute the following commands on the Camera:
##### Generate C++ example code in the local directory
  aidlux@aidlux:~$ appc init -t "cpp" -n demoApp
aidlux@aidlux:~$ cd demoApp##### Generate Python example code in the local directory
aidlux@aidlux:~$ appc init -t "py" -n demoApp
aidlux@aidlux:~$ cd demoAppApplication Source Code Description
File structure as follows:
├── README.md
├── config                   #Configuration files
│   ├── camera.config        #Camera parameter config (needs camera parameter config description)
│   ├── algorithm.config     #Algorithm parameter config (needs algorithm parameter config description)
│   ├── model.config         #Model-related config file
├── imgs                     #Static image directory
├── lib                      #Third-party library directory
├── manager.sh               #App startup script
├── model                    #Model file directory
│   ├── Segment_V41_0
│   │   └── det_bestModelIoU_xxx_int8.serialized.bin  #Model file
│   ├── det.txt
│   └── modelInfo.json       #Model config file
├── release.txt              #App description file
├── src                      #App main program directory
│   ├── CMakeLists.txt       #CMake build file
│   ├── main.cpp             #App main code
│   ├── main.hpp             #App main code header
│   └── model.cpp            #Model loading main code
├── svapp #Executable program file├── config #Configuration files
│ ├── camera.config #Camera parameter config (needs camera parameter config description)
│ ├── algorithm.config #Algorithm parameter config (needs algorithm parameter config description)
│ ├── model.config #Model-related config file
├── lib #Third-party library directory
├── manager.sh #App startup script
├── model #Model file directory
│ ├── Segment_V41_0
│ │ └── det_bestModelIoU_xxx_int8.serialized.bin #Model file
│ ├── det.txt
│ └── modelInfo.json #Model config file
├── release.txt #App description file
├── svapp.py #App main codeCompile Source Code and Package/Deploy to Camera
C++ Example
1. Verify Camera CMake Build Environment
Run cmake to check if the cmake command is installed.
##### cmake not installed
aidlux@aidlux:~$ cmake
bash: cmake: command not found
If not installed, run the following commands to install cmake.
aidlux@aidlux:~$ sudo apt-get update
aidlux@aidlux:~$ sudo apt-get install cmake
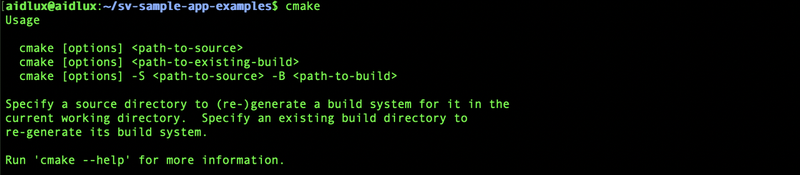
After installation, running cmake and seeing help information indicates successful installation, as shown below:
2. Compile Source Code
Execute on Camera:
##### Enter the example app directory
aidlux@aidlux:~$ cd ~/demoApp

##### Run compile commands
aidlux@aidlux:~/demoApp$ cd src/
aidlux@aidlux:~/demoApp/src$ mkdir build
aidlux@aidlux:~/demoApp/src$ cd build/
aidlux@aidlux:~/demoApp/src/build$ cmake ..
aidlux@aidlux:~/demoApp/src/build$ make
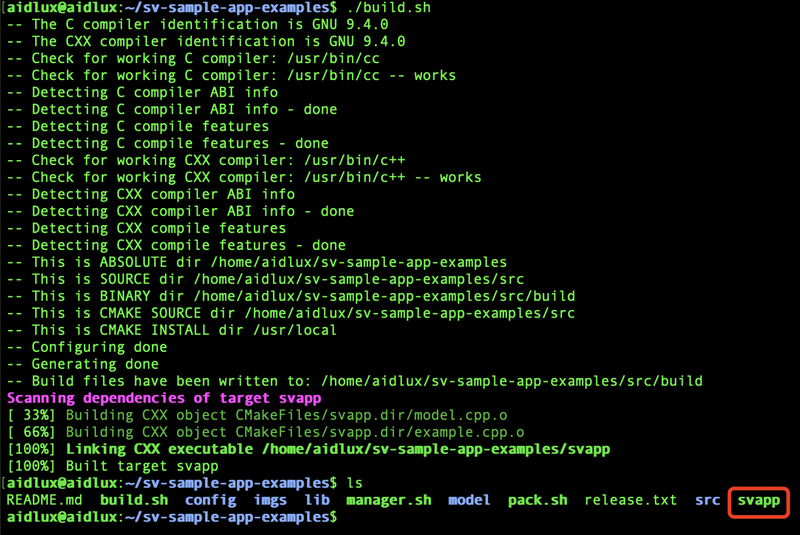
After compilation, an executable file svapp will be generated in the app root directory.
3. Package and Deploy the App
Execute on Camera:
##### Run app packaging command
aidlux@aidlux:~$ appc package -p ~/demoApp
After packaging, a deployable app package is generated in the app directory:

At this point, the entire app packaging is complete. Next, proceed with the deployment workflow. You can deploy the app on this camera to preview results immediately, or deploy it to other camera devices.
Scenario 1: Deploy the app to this camera device:
Execute on Camera: (1) Run the SVE app installation command
# Run SVE app installation command
aidlux@aidlux:~$ appc install ~/demoApp.zip
💡Note:
If the installation process prompts that the app already exists, you can force overwrite installation by adding the "-f" parameter:
appc install -f ~/demoApp.zip
(2) Restart the smart camera application runtime framework
💡Note:
You need to restart the camera application runtime framework service before the smart camera app list can reload and display the extracted application.
##### Enter the smart camera app framework directory
cd /opt/aidlux/cpf/aid-sve/

##### Restart the camera app runtime framework
sudo ./manager.sh restart
(3) Open the camera management webpage, go to Task Management, and view the deployed app.
If the example app appears in the app list, it indicates successful deployment.
Scenario 2: Deploy the app to another camera — first copy the app package to the PC
Execute on PC: (1) Copy the app package to the PC locally
# Copy the packaged app from the camera to the PC locally
scp aidlux@[camera IP]:/home/aidlux/demoApp.zip ./
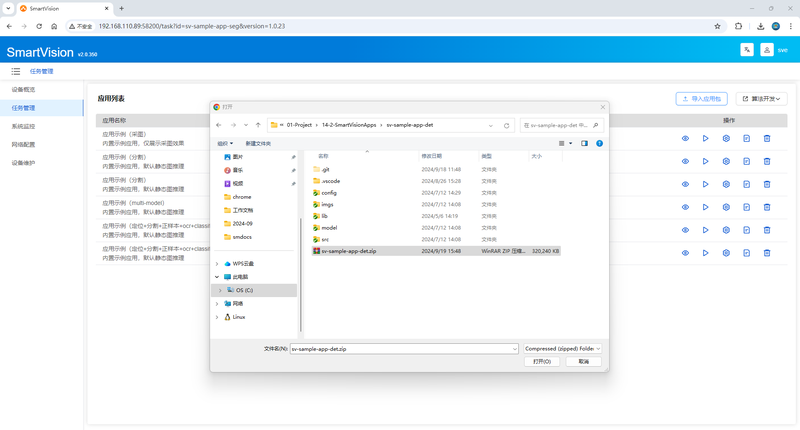
(2) Open the other camera's management webpage, go to Task Management, click Import App Package, and select the app package on the PC.
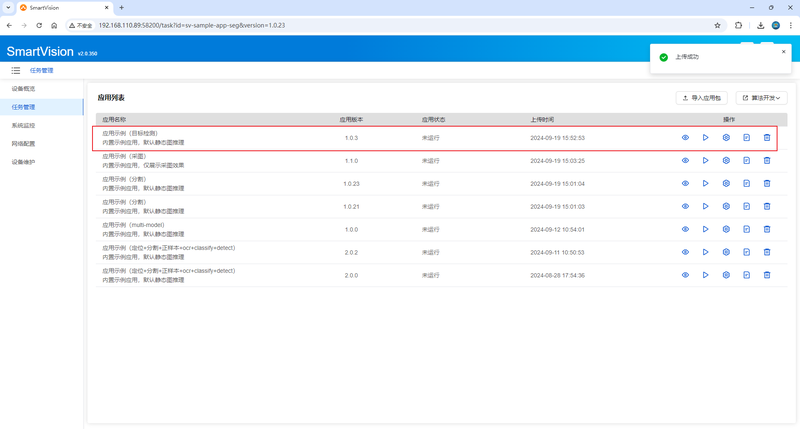
After importing, if the example app appears in the app list, it indicates successful deployment.
Generate App from SVS and Deploy to Camera
Updating ...
Multimedia
QT Development Guide
QT5 Development Environment
1. Verify Camera qmake Build Environment
Run qmake to check if the qmake command is installed.
##### qmake not installed
aidlux@aidlux:~$ qmake
bash: qmake: command not found
If not installed, run the following commands to install qmake.
aidlux@aidlux:~$ sudo apt-get update
aidlux@aidlux:~$ sudo apt install qt5-qmake
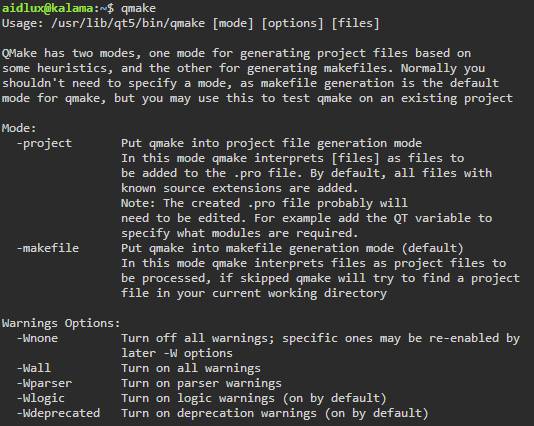
After installation, running qmake and seeing help information indicates successful installation, as shown below:
2. Install QT Core Modules
Install necessary core modules
sudo apt update
sudo apt install qtbase5-dev
💡Note:
If you need to use other QT framework modules, please install them separately.
3. Compile Source Code
Example Code:
main.cpp
#include <QApplication>
#include <QWidget>
int main(int argc, char *argv[])
{
    QApplication a(argc, argv);
    QWidget w;
    w.show();
    return a.exec();
}
test.pro
QT += core gui widgets

SOURCES += \
    main.cpp \
Compile the program:
##### Enter the example app directory
aidlux@aidlux:~$ cd ~/test

##### Run compile commands
aidlux@aidlux:~/test/$ mkdir build
aidlux@aidlux:~/test/$ cd build/
aidlux@aidlux:~/test/build$ qmake ..
aidlux@aidlux:~/test/build$ make
After compilation, an executable file test will be generated in the app build directory.

Run the program:
After connecting the camera via HDMI, run the program to display the example QT desktop application window.
##### Run the example app
aidlux@aidlux:~/test/build$ ./test
💡Note:
QT desktop applications must be displayed on the Linux desktop via a direct HDMI connection to the camera.
Desktop Development Environment Differences
AidLux Desktop
Offers better GPU support, so it is recommended to use the SmartVision SDK's FD (file descriptor) API.
The program needs to control the loop internally, obtaining the camera video stream socket via zero-copy for higher rendering performance.
##### Open camera
int start_camera(int8_t idx)

##### Get video stream socket
int get_fd_with_meta_extern(int idx, AidluxSocketfdInfo &out_meta)

##### Close camera
int8_t close_camera(int8_t idx)
XFCE4 Desktop
Has inherently poorer GPU compatibility, so it is recommended to use the SmartVision SDK's shared memory API.
No need to control the call frequency manually; YUV image data is obtained directly via callback function.
##### Open camera with default configuration (parameterless)
int start_camera_without_parameter(GetImageCB cb, int8_t preview, int8_t idx)

##### Start image capture
void start_camera_capture(int idx)

##### Convert YUV format image data to BGR format
bool yuv_to_bgr_thumbnail(cv::Mat &destMat, int srcSliceHeight, int srcYPlaneStride, int planeOffset, void *memdata, int idx)

##### Stop image capture
void stop_camera_capture(int idx)

##### Close camera
int8_t close_camera(int8_t idx)
Robotics or Scenario Examples
To be added.